さらに前回に引き続き、WPFでグリッド状の模様を書く方法について考えてみる。
今回の方法は、DrawingBrushを定義して、そのブラシで背景を塗りつぶす方法である。
今回のコードはxamlのみとなる。
MainWindow.xaml
<Window x:Class="WpfDrawingBrushLesson.MainWindow"
        xmlns="http://schemas.microsoft.com/winfx/2006/xaml/presentation"
        xmlns:x="http://schemas.microsoft.com/winfx/2006/xaml"
        Title="MainWindow" Height="350" Width="525">
    <Window.Resources>
        <DrawingBrush x:Key="gridBrush"
                      Viewport="0,0,10,10"
                      ViewportUnits="Absolute"
                      TileMode="Tile">
            <DrawingBrush.Drawing>
                <GeometryDrawing>
                    <GeometryDrawing.Geometry>
                        <PathGeometry>
                            <PathFigure StartPoint="0,0">
                                <LineSegment Point="0,10"></LineSegment>
                                <LineSegment Point="10,10"></LineSegment>
                            </PathFigure>
                        </PathGeometry>
                    </GeometryDrawing.Geometry>
                    <GeometryDrawing.Pen>
                        <Pen Brush="LightBlue" Thickness="1"></Pen>
                    </GeometryDrawing.Pen>
                </GeometryDrawing>
            </DrawingBrush.Drawing>
        </DrawingBrush>
    </Window.Resources>
    <Grid>
        <Canvas Background="{StaticResource gridBrush}"></Canvas>
    </Grid>
</Window>
この中で、DrawingBrushを定義しているのは6-25行目の以下の部分である。
<DrawingBrush x:Key="gridBrush"
              Viewport="0,0,10,10"
              ViewportUnits="Absolute"
              TileMode="Tile">
    <DrawingBrush.Drawing>
        <GeometryDrawing>
            <GeometryDrawing.Geometry>
                <PathGeometry>
                    <PathFigure StartPoint="0,0">
                        <LineSegment Point="0,10"></LineSegment>
                        <LineSegment Point="10,10"></LineSegment>
                    </PathFigure>
                </PathGeometry>
            </GeometryDrawing.Geometry>
            <GeometryDrawing.Pen>
                <Pen Brush="LightBlue" Thickness="1"></Pen>
            </GeometryDrawing.Pen>
        </GeometryDrawing>
    </DrawingBrush.Drawing>
</DrawingBrush>
座標0,0から0,10へ線を引き、続いて0,10から10,10へ線を引くようにPathGeometryを定義している。
7-14行目の部分はパスマークアップを使って
<GeometryDrawing Geometry="M0,0 L0,10 10,10">
のように書いても良い。(慣れればこちらの方が簡単だろう。)
このxamlを実行すると、以下のように表示される。
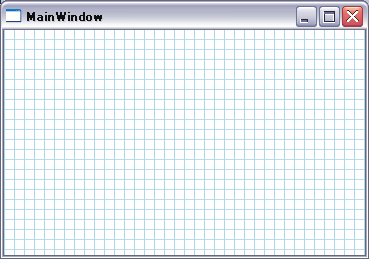
単純なグリッド模様を書きたいときはこの方法がベストかもしれない。
しかし、間隔が固定のため、柔軟性があるとは言えない。
追記(2011/08/28):
ブラシに定義しているGeometryに対してScaleTransformを適用すると、間隔を変えることが出来る。
例えば、ブラシ部分のxamlを以下のように記述する。
<DrawingBrush x:Key="gridBrush"
              Viewport="0,0,10,10"
              ViewportUnits="Absolute"
              TileMode="Tile"
              >
    <DrawingBrush.Drawing>
        <GeometryDrawing >
            <GeometryDrawing.Geometry>
                <PathGeometry>
                    <PathFigure StartPoint="0,0">
                        <LineSegment Point="0,10"></LineSegment>
                        <LineSegment Point="10,10"></LineSegment>
                    </PathFigure>
                    <PathGeometry.Transform>
                        <ScaleTransform ScaleX="{Binding ElementName=slider,Path=Value}"></ScaleTransform>
                    </PathGeometry.Transform>
                </PathGeometry>
            </GeometryDrawing.Geometry>
            <GeometryDrawing.Pen>
                <Pen Brush="LightBlue" Thickness="1"></Pen>
            </GeometryDrawing.Pen>
        </GeometryDrawing>
    </DrawingBrush.Drawing>
</DrawingBrush>
追記したのは14-15行目の部分で、ScaleTransformを適用している。
そして、プログラム全体では以下のようにxamlを書いた。
MainWindow.xaml
<Window x:Class="WpfDrawingBrushLesson.MainWindow"
        xmlns="http://schemas.microsoft.com/winfx/2006/xaml/presentation"
        xmlns:x="http://schemas.microsoft.com/winfx/2006/xaml"
        Title="MainWindow" Height="350" Width="525">
    <Window.Resources>
        <DrawingBrush x:Key="gridBrush"
                      Viewport="0,0,10,10"
                      ViewportUnits="Absolute"
                      TileMode="Tile"
                      >
            <DrawingBrush.Drawing>
                <GeometryDrawing >
                    <GeometryDrawing.Geometry>
                        <PathGeometry>
                            <PathFigure StartPoint="0,0">
                                <LineSegment Point="0,10"></LineSegment>
                                <LineSegment Point="10,10"></LineSegment>
                            </PathFigure>
                            <PathGeometry.Transform>
                                <ScaleTransform ScaleX="{Binding ElementName=slider,Path=Value}"></ScaleTransform>
                            </PathGeometry.Transform>
                        </PathGeometry>
                    </GeometryDrawing.Geometry>
                    <GeometryDrawing.Pen>
                        <Pen Brush="LightBlue" Thickness="1"></Pen>
                    </GeometryDrawing.Pen>
                </GeometryDrawing>
            </DrawingBrush.Drawing>
        </DrawingBrush>
    </Window.Resources>
    <Grid>
        <Grid.RowDefinitions>
            <RowDefinition></RowDefinition>
            <RowDefinition Height="24"></RowDefinition>
        </Grid.RowDefinitions>
        <Canvas Background="{StaticResource gridBrush}">
            <Canvas.RenderTransform>
                <ScaleTransform ScaleX="{Binding ElementName=slider,Path=Value}"></ScaleTransform>
            </Canvas.RenderTransform>
        </Canvas>
        <Slider Grid.Row="1" Name="slider" Minimum="1" Maximum="10" TickFrequency="0.1"></Slider>
    </Grid>
</Window>
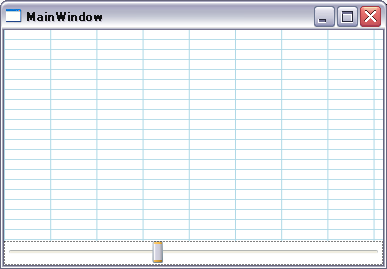
このxamlを実行すると以下のようになる。
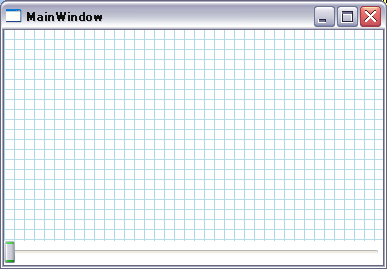
スライダーを動かして、横幅の表示倍率を変えることが出来る。
ピンバック: 【WPF】グリッド状の模様を描く その(4)Geometryでグリッド模様を書く(失敗?) – ザワプロ!