Swingのレイアウトの一つである、GroupLayoutを使ってみよう。このレイアウトはJ2SE6から追加された、比較的新しいレイアウトである。
本来は、IDEのデザイナでコードを自動生成していくような使い方を想定しているようだが、ハンドコーディングすることももちろん可能である。しかし、考え方は少しややこしい。
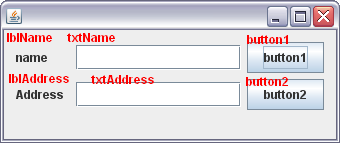
以下のような画面を構築することを考えてみる。

各コンポーネントには、以下のような名前を付けておいた。
GroupLayoutを使うには、水平方向のレイアウト定義と垂直方向のレイアウト定義をしなければならない。
各コンポーネントはこれらの両方のレイアウトに属している必要がある。
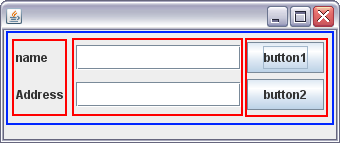
水平グループの定義は以下のようなイメージで行う。
青で示したのがSequentialGroup,赤で示したのがParallelGroupである。
実際のコードは以下のようになる。
layout.setHorizontalGroup(
    layout.createSequentialGroup()
        .addGroup(layout.createParallelGroup()
            .addComponent(lblName)
            .addComponent(lblAddress))
        .addGroup(layout.createParallelGroup()
            .addComponent(txtName)
            .addComponent(txtAddress))
        .addGroup(layout.createParallelGroup()
            .addComponent(button1)
            .addComponent(button2)));
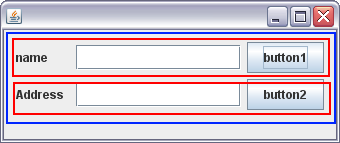
垂直グループの定義は以下のようなイメージで行う。
青で示したのがSequentialGroup,赤で示したのがParallelGroupである。
実際のコードは以下のようになる。
layout.setVerticalGroup(
    layout.createSequentialGroup()
        .addGroup(layout.createParallelGroup(Alignment.BASELINE)
            .addComponent(lblName)
            .addComponent(txtName)
            .addComponent(button1))
        .addGroup(layout.createParallelGroup(Alignment.BASELINE)
            .addComponent(lblAddress)
            .addComponent(txtAddress)
            .addComponent(button2)));
最後に、コード全体を示す。
public class MyFrame extends JFrame
{
    /**
     * コンストラクタ
     */
    public MyFrame(){

        // 各コンポーネントは垂直グループ、水平グループの両方に属していなければならない
        JLabel lblName = new JLabel();
        lblName.setText("name");

        JTextField txtName = new JTextField();

        JButton button1 = new JButton();
        button1.setText("button1");

        JLabel lblAddress = new JLabel();
        lblAddress.setText("Address");

        JTextField txtAddress = new JTextField();

        JButton button2 = new JButton();
        button2.setText("button2");


        // GroupLayout の生成
        GroupLayout layout = new GroupLayout(getContentPane());
        getContentPane().setLayout(layout);

        layout.setAutoCreateGaps(true);
        layout.setAutoCreateContainerGaps(true);


        // 水平グループの定義
        //   列の方向に縦に平行に並んでいる要素を定義していく。
        //+- SequentialGroup ---------------------------------+
        //|+---------------+ +--------------+ +--------------+|
        //||ParallelGroup  | |ParallelGroup | |ParallelGroup ||
        //||+-------------+| |+------------+| |+------------+||
        //|||lblName      || ||txtName     || || button1    |||
        //|||lblAddress   || ||txtAddress  || || button2    |||
        //||+-------------+| |+------------+| |+------------+||
        //|+---------------+ +--------------+ +--------------+|
        //+---------------------------------------------------+
        layout.setHorizontalGroup(
            layout.createSequentialGroup()
                .addGroup(layout.createParallelGroup()
                    .addComponent(lblName)
                    .addComponent(lblAddress))
                .addGroup(layout.createParallelGroup()
                    .addComponent(txtName)
                    .addComponent(txtAddress))
                .addGroup(layout.createParallelGroup()
                    .addComponent(button1)
                    .addComponent(button2)));

        // 垂直グループの定義
        //   行の方向に、横に平行に並んでいる要素を定義していく。
        //+-SequentialGroup ------------------------------+
        //|+---------------------------------------------+|
        //||              +-----------------------------+||
        //||ParallelGroup |lblName    txtName    button1|||
        //||              +-----------------------------+||
        //|+---------------------------------------------+|
        //|+---------------------------------------------+|
        //||              +-----------------------------+||
        //||ParallelGroup |lblAddress txtAddress button2|||
        //||              +-----------------------------+||
        //|+---------------------------------------------+|
        //+-----------------------------------------------+
        layout.setVerticalGroup(
            layout.createSequentialGroup()
                .addGroup(layout.createParallelGroup(Alignment.BASELINE)
                    .addComponent(lblName)
                    .addComponent(txtName)
                    .addComponent(button1))
                .addGroup(layout.createParallelGroup(Alignment.BASELINE)
                    .addComponent(lblAddress)
                    .addComponent(txtAddress)
                    .addComponent(button2)));
    }

    /**
     * エントリーポイント
    * @param args
    */
    public static void main(String[] args) {

        SwingUtilities.invokeLater(new Runnable() {

            @Override
            public void run() {
                JFrame frame = new MyFrame();

                frame.setDefaultCloseOperation(JFrame.EXIT_ON_CLOSE);
                frame.setSize(300, 200);
                frame.setVisible(true);
            }
        });
    }
}