Viewを継承した独自のカスタムビュー内のレイアウトをxmlで定義することができる。
レイアウトに関する事はJavaコードで書くよりもxmlで定義しておいたほうがコード量が減るし、後々メンテナンスしやすくなる。
今回はこの方法について見ていく。
まず、サンプルアプリの完成形となる画面を示す。
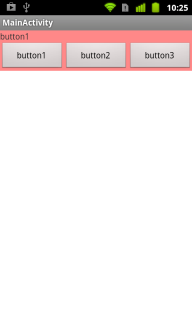
画面上部に表示された赤色の部分がカスタムビューとなっている。
テキストビューとその下に3つボタンがあって、それぞれのボタンを押すとテキストビューに押したボタンのテキストが表示されるようになっている。
まずは、このカスタムビューに適用するレイアウトxmlを示す。
<?xml version="1.0" encoding="utf-8"?>
<LinearLayout xmlns:android="http://schemas.android.com/apk/res/android"
    android:layout_width="match_parent"
    android:layout_height="match_parent"
    android:orientation="vertical"
    android:background="#FF8888" >
    <TextView
        android:id="@+id/textView"
        android:layout_width="match_parent"
        android:layout_height="wrap_content"
        android:text=""/>
    <LinearLayout
        android:layout_width="match_parent"
        android:layout_height="wrap_content"
        android:orientation="horizontal"
        >
        <Button
            android:id="@+id/button1"
            android:layout_width="0dp"
            android:layout_height="wrap_content"
            android:layout_weight="1"
            android:text="button1"/>
        <Button
            android:id="@+id/button2"
            android:layout_width="0dp"
            android:layout_height="wrap_content"
            android:layout_weight="1"
            android:text="button2"/>
        <Button
            android:id="@+id/button3"
            android:layout_width="0dp"
            android:layout_height="wrap_content"
            android:layout_weight="1"
            android:text="button3"/>
    </LinearLayout>
</LinearLayout>
このxmlを見ると分かるとおり、内容は通常ActivityのsetContentView()で渡しているxmlの形式と変わらない。
次に、カスタムビューのJavaコード部分を示す。
package com.example.customviewlayoutlesson;

import android.content.Context;
import android.util.AttributeSet;
import android.view.LayoutInflater;
import android.view.View;
import android.widget.Button;
import android.widget.LinearLayout;
import android.widget.TextView;

// 適用するレイアウトxmlのトップレベルViewがLinearLayoutなので、ここでもLinearLayoutを継承する
public class MyView extends LinearLayout {

    public MyView(Context context, AttributeSet attrs) {
        super(context, attrs);

        // LayoutInflaterでレイアウトxmlの内容でViewを作る
        // LayoutInflater#inflate()の第2引数ではルートとなるViewとして自分自身を指定する
        View layout = LayoutInflater.from(context).inflate(R.layout.myview, this);
        final TextView textView = (TextView)layout.findViewById(R.id.textView);

        final View.OnClickListener onClickListener = new OnClickListener() {
            public void onClick(View v) {
                // 押されたボタンのテキストをTextViewに表示する
                textView.setText( ((Button)v).getText() );
            }
        };

        layout.findViewById(R.id.button1).setOnClickListener(onClickListener);
        layout.findViewById(R.id.button2).setOnClickListener(onClickListener);
        layout.findViewById(R.id.button3).setOnClickListener(onClickListener);
    }

}
本来、カスタムビューはViewを継承すれば良いのだが、今回はLinearLayoutを継承している。
これは、適用するxmlのトップレベルのViewがLinearLayoutだからで、その型を合わせる必要があるからである。
サンプルではLinearLayoutを例として取り上げたが、ほかにもViewGroupの子クラスのFrameLayoutやRelativeLayoutなどが使える。
19行目で、LayoutInflator#inflate()メソッドを使ってレイアウトxmlからViewを作っている。このメソッドの第2引数で、ルートとなるViewとして自分自身を指定する。こうすることでレイアウトxmlの内容がカスタムビューに適用される。
その後は、いつものActivity#onCreate()の中で行っている手順と同様、findViewById()メソッドで操作したいViewをレイアウトから取得できる。
今回のサンプルでは28-30行目でレイアウト内の3つのボタンにイベントリスナをセットしている。
最後にMain側のレイアウトxmlとActivityのソースを示す。
<RelativeLayout xmlns:android="http://schemas.android.com/apk/res/android"
    xmlns:tools="http://schemas.android.com/tools"
    android:layout_width="match_parent"
    android:layout_height="match_parent" >

    <com.example.customviewlayoutlesson.MyView
        android:layout_width="match_parent"
        android:layout_height="wrap_content" />
</RelativeLayout>
package com.example.customviewlayoutlesson;

import android.os.Bundle;
import android.app.Activity;
import android.view.Menu;
import android.view.MenuItem;
import android.support.v4.app.NavUtils;

public class MainActivity extends Activity {

    @Override
    public void onCreate(Bundle savedInstanceState) {
        super.onCreate(savedInstanceState);
        setContentView(R.layout.activity_main);
    }
}
主要な処理は全てカスタムビュー側に書いてしまったので、Main側の処理はメインレイアウトxmlでカスタムビューを定義するだけになった。
このようにして、各部分のコンポーネント化を押し進めていくとコードの保守性・可読性が上がっていくだろう。