前回の記事を応用してカウント読み上げタイマーを作成してみよう。
アプリの画面構成は以下のようになる。
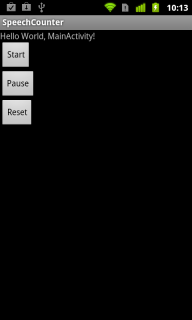
startボタンを押すとカウント読み上げを開始する。
pauseボタンを押すとカウントを一時停止する。
resetボタンを押すとカウント値をリセットする。
この画面のレイアウトxmlは以下のようになる。
layout.xml
<?xml version="1.0" encoding="utf-8"?>
<LinearLayout xmlns:android="http://schemas.android.com/apk/res/android"
    android:orientation="vertical"
    android:layout_width="fill_parent"
    android:layout_height="fill_parent"
    >
<TextView
    android:layout_width="fill_parent"
    android:layout_height="wrap_content"
    android:text="@string/hello"
    />
<Button android:text="Start"
    android:id="@+id/btnStart"
    android:layout_width="wrap_content"
    android:layout_height="wrap_content">
</Button>
<Button android:text="Pause"
    android:id="@+id/btnPause"
    android:layout_width="wrap_content"
    android:layout_height="wrap_content">
</Button>
<Button android:text="Reset"
    android:id="@+id/btnReset"
    android:layout_width="wrap_content"
    android:layout_height="wrap_content">
</Button>
</LinearLayout>
次に、カウント処理を別クラスにまとめることにした。ソースは以下のようになる。
Counter.java
package com.lesson.tts;

import java.util.concurrent.Executors;
import java.util.concurrent.ScheduledExecutorService;
import java.util.concurrent.ScheduledFuture;
import java.util.concurrent.TimeUnit;

/**
 * カウントアップクラス
 * 1秒ごとにイベントが呼ばれる
 */
public class Counter {
    private final ScheduledExecutorService ses = Executors.newSingleThreadScheduledExecutor();
    private ScheduledFuture<?> future = null;

    private int count = 0;

    public interface OnCountListener{
        void onCount( int count );
    }

    private OnCountListener listener;
    public void setOnCountListener(OnCountListener l){
        this.listener = l;
    }

    private final Runnable task = new Runnable() {
        @Override
        public void run() {
            // 一秒ごとに呼び出される。
            if( listener != null ){
                listener.onCount(count);
            }
            count++;
        }
    };

    /**
     * スタート
     */
    public void start(){
        if( future == null){
            future = ses.scheduleAtFixedRate(task, 0, 1000, TimeUnit.MILLISECONDS);
        }
    }

    /**
     * 停止
     */
    public void pause(){
        if( future != null ){
            future.cancel(true);
            future = null;
        }
    }

    /**
     * カウントリセット
     */
    public void reset(){
        count = 0;
    }
}
ScheduledExecutorServiceを使い、等間隔で定期的な処理を行うようにしている。
このクラスにイベントリスナをセットすれば、カウントされたタイミングでイベントを受けることができる。
最後に、MainActivityを示す。
MainActivity.java
package com.lesson.tts;

import java.util.concurrent.TimeUnit;

import android.app.Activity;
import android.os.Bundle;
import android.speech.tts.TextToSpeech;
import android.speech.tts.TextToSpeech.OnInitListener;
import android.view.View;
import android.view.View.OnClickListener;

import com.lesson.tts.Counter.OnCountListener;

public class MainActivity extends Activity {

    private TextToSpeech tts;
    private final Counter counter = new Counter();

    /** Called when the activity is first created. */
    @Override
    public void onCreate(Bundle savedInstanceState) {
        super.onCreate(savedInstanceState);
        setContentView(R.layout.main);

        // カウントイベント時処理
        counter.setOnCountListener(new OnCountListener() {

            @Override
            public void onCount(int count) {
                tts.speak("" + count, TextToSpeech.QUEUE_FLUSH, null);
            }
        });

        // TextToSpeech生成
        tts = new TextToSpeech(this,new OnInitListener() {

            @Override
            public void onInit(int status) {
                // TODO Auto-generated method stub
            }
        });

        // カウント開始
        findViewById(R.id.btnStart).setOnClickListener(new OnClickListener() {

            @Override
            public void onClick(View v) {
                counter.start();
            }
        });

        // 一時停止
        findViewById(R.id.btnPause).setOnClickListener(new OnClickListener() {

            @Override
            public void onClick(View v) {
                counter.pause();
            }
        });

        // カウントリセット
        findViewById(R.id.btnReset).setOnClickListener(new OnClickListener() {

            @Override
            public void onClick(View v) {
                counter.reset();
            }
        });
    }

    @Override
    protected void onPause() {
        // TODO Auto-generated method stub
        super.onPause();

        counter.pause();
    }

    @Override
    protected void onDestroy() {
        // TODO Auto-generated method stub
        super.onDestroy();
        tts.shutdown();
    }
}
カウントアップ処理は外にまとめたので非常にシンプルなコードになっている。
MainActivityでやることは、カウントイベントのタイミングでSpeechToTextにカウント値を読み上げさせるだけである。
後は、アプリのライフサイクルイベントにあわせてカウンターの停止やSpeechToTextのシャットダウンを行う。
以上で簡単ながらカウント読み上げタイマーを作成することができた。
今回はカウントアップしかできないが、応用すればカウントダウンタイマーにしたりできるだろう。
※注)MainActivity側に書いてあるカウントイベント処理内(29-31行目)でUI要素を操作することはできない。
このイベントはUIスレッドとは別のスレッドから起動されるからである。このイベント内でUI要素を操作したいときはHandlerを使う必要がある。その場合は、例えば以下のようなソースになる。
                handler.post(new Runnable() {

                    @Override
                    public void run() {
                        ((TextView)findViewById(R.id.txtInfo)).setText("" + count);
                    }
                });