Androidでテキストスピーチ機能を使うには、TextToSpeechクラスを使う。
今回は、簡単なTextToSpeechのサンプルプログラムを示す。
まずは画面構成から示す。
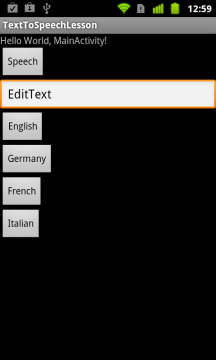
一番上にある「Speech」ボタンを押すとその下のテキストボックスにある内容をスピーチする。
さらにその下に並べてあるボタンを押すと、スピーチの言語をその国のものに切り替えられる。
この画面のxmlは以下のようになる。
main.xml
<?xml version="1.0" encoding="utf-8"?>
<LinearLayout xmlns:android="http://schemas.android.com/apk/res/android"
    android:orientation="vertical"
    android:layout_width="fill_parent"
    android:layout_height="fill_parent"
    >
<TextView
	android:id="@+id/info"
    android:layout_width="fill_parent"
    android:layout_height="wrap_content"
    android:text="@string/hello"
    />
<Button
	android:text="Speech"
	android:id="@+id/btnSpeech"
	android:layout_width="wrap_content"
	android:layout_height="wrap_content"></Button>
<EditText android:text="EditText"
	android:id="@+id/editText1"
	android:layout_width="match_parent"
	android:layout_height="wrap_content"></EditText>
<Button
	android:text="English"
	android:id="@+id/btnLocaleEn"
	android:layout_width="wrap_content"
	android:layout_height="wrap_content"></Button>
<Button
	android:text="Germany"
	android:id="@+id/btnLocaleGe"
	android:layout_width="wrap_content"
	android:layout_height="wrap_content"></Button>
<Button
	android:text="French"
	android:id="@+id/btnLocaleFr"
	android:layout_width="wrap_content"
	android:layout_height="wrap_content"></Button>
<Button
	android:text="Italian"
	android:id="@+id/btnLocaleIt"
	android:layout_width="wrap_content"
	android:layout_height="wrap_content"></Button>
</LinearLayout>
そしてAcitivtyのソースは以下のようになる。
MainActivity.java
package com.lesson.tts;

import java.util.Locale;

import android.app.Activity;
import android.os.Bundle;
import android.speech.tts.TextToSpeech;
import android.speech.tts.TextToSpeech.OnInitListener;
import android.util.Log;
import android.view.View;
import android.view.View.OnClickListener;
import android.widget.TextView;

public class MainActivity extends Activity {
    private TextToSpeech tts;

    @Override
    protected void onCreate(final Bundle savedInstanceState) {
        super.onCreate(savedInstanceState);
        setContentView(R.layout.main);

        Log.d("MainActivity","onCreate");

        tts = new TextToSpeech(getApplicationContext(), new OnInitListener() {

			@Override
			public void onInit(int status) {
				// TODO Auto-generated method stub
		        if (status == TextToSpeech.SUCCESS) {
		        	Log.d("MainActivity", "TextToSpeech Init Success.");
		        } else {
		            Log.d("MainActivity", "TextToSpeech Init Error.");
		        }
			}
		});


        final TextView info = (TextView)findViewById(R.id.info);
        findViewById(R.id.btnSpeech).setOnClickListener(new OnClickListener() {

			@Override
			public void onClick(View v) {
		        TextView textView = (TextView)findViewById(R.id.editText1);
		        tts.speak(textView.getText().toString(), TextToSpeech.QUEUE_FLUSH, null);
		        info.setText(tts.getLanguage().toString());
			}
		});

        findViewById(R.id.btnLocaleEn).setOnClickListener(new OnClickListener() {

			@Override
			public void onClick(View v) {
				// TODO Auto-generated method stub
				tts.setLanguage(Locale.ENGLISH);
				info.setText(tts.getLanguage().toString());
			}
		});

        findViewById(R.id.btnLocaleGe).setOnClickListener(new OnClickListener() {

			@Override
			public void onClick(View v) {
				// TODO Auto-generated method stub
				tts.setLanguage(Locale.GERMANY);
				info.setText(tts.getLanguage().toString());
			}
		});

        findViewById(R.id.btnLocaleFr).setOnClickListener(new OnClickListener() {

			@Override
			public void onClick(View v) {
				// TODO Auto-generated method stub
				tts.setLanguage(Locale.FRENCH);
				info.setText(tts.getLanguage().toString());
			}
		});

        findViewById(R.id.btnLocaleIt).setOnClickListener(new OnClickListener() {

			@Override
			public void onClick(View v) {
				// TODO Auto-generated method stub
				tts.setLanguage(Locale.ITALIAN);
				info.setText(tts.getLanguage().toString());
			}
		});
    }

    @Override
    protected void onDestroy() {
        super.onDestroy();
        tts.shutdown();
    }
}
ボタン押下の処理があるので少し長いソースコードになっているが、重要なのは24-36行目の部分である。
この部分でTextToSpeechクラスのインスタンスの生成を行っている。
TextToSpeechのインスタンスを生成するにはOnInitListenerインターフェースの実装を第二引数に渡す必要がある。
TextToSpeechが初期化されると、このインターフェースのonInit()が呼ばれるので、正しく初期化されたかどうかが分かる。
エディットボックスの下にある言語選択ボタンを押すと、TextToSpeechクラスのsetLanguage()を使ってロケールをセットしている。
言語を変えてスピーチさせてみると確かにその国の言語で喋っている・・・ように聞こえた。
そして最後に、onDestroy時に91-94行目でTextToSpeechをシャットダウンしている。
ところで、手持ちの端末でどの言語が喋れるかどうかは「設定」→「音声入出力」→「テキスト読み上げの設定」→「言語」で確認できる。私の端末では以下のようになっていた。
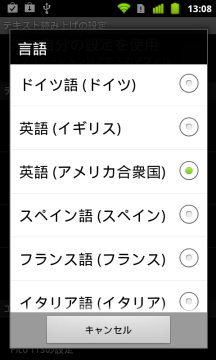
残念ながら、日本語は無い様である。
ピンバック: 【Android】カウント読み上げタイマーの作成 – ザワプロ!