WPFのバインディングは強力だが、自分で定義したプロパティにバインディングするのは少し面倒である。
その方法を学ぶため、簡単なサンプルアプリを作ってみることにした。
まず、今回どのようなアプリを作ったかを示す。
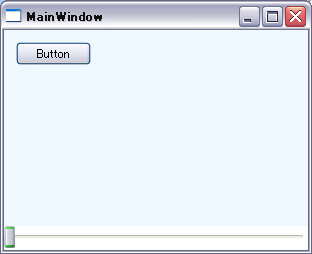
始めにアプリを起動すると、以下のように表示される。
左上のボタンを押すと、ランダムな色、大きさ、位置で円が配置される。
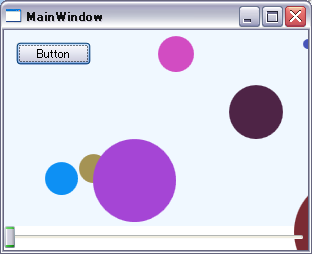
下のスライダーを動かすと、円の表示倍率が一様に変化する。
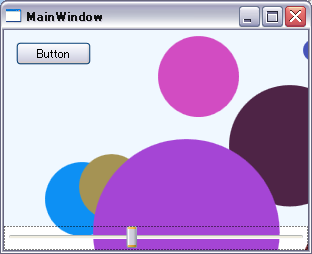
(※RenderTransformはCanvas全体ではなく、それぞれの円に対してかかっている。
このため、円の大きさは変化するが位置は変わらない。)
以上が今回のサンプルアプリである。
それでは、次にソースコードを示していく。
まずはMainWindowのxamlである。
<Window x:Class="PropertyBindingLesson.MainWindow"
        xmlns="http://schemas.microsoft.com/winfx/2006/xaml/presentation"
        xmlns:x="http://schemas.microsoft.com/winfx/2006/xaml"
        xmlns:my="clr-namespace:PropertyBindingLesson"
        Title="MainWindow" Height="350" Width="525">
    <Grid>
        <Grid.RowDefinitions>
            <RowDefinition></RowDefinition>
            <RowDefinition Height="24"></RowDefinition>
        </Grid.RowDefinitions>
        <my:MyUserControl MyScale="{Binding ElementName=slider,Path=Value}"></my:MyUserControl>
        <Slider Grid.Row="1" Name="slider" Minimum="1" Maximum="4" TickFrequency="0.1" />
    </Grid>
</Window>
11行目で宣言しているMyUserControlというのが、このアプリの主となる動作を担っている。ボタンを押すとUserControl内にあるCanvasに次々と円を追加していくようになっている。そしてMyScaleというのがMyUserControlに自分で定義したプロパティで、sliderのValueにバインディングしてある。
xamlでバインディングするには、単にC#のクラスにプロパティを定義するだけではなく、やや複雑なコードを書く必要がある。そしてそれがこの記事の本題なのだが、その前にMyUserControlのxamlを示す。
<UserControl x:Class="PropertyBindingLesson.MyUserControl"
             xmlns="http://schemas.microsoft.com/winfx/2006/xaml/presentation"
             xmlns:x="http://schemas.microsoft.com/winfx/2006/xaml"
             xmlns:mc="http://schemas.openxmlformats.org/markup-compatibility/2006"
             xmlns:d="http://schemas.microsoft.com/expression/blend/2008"
             mc:Ignorable="d"
             d:DesignHeight="300" d:DesignWidth="300" Background="AliceBlue">
    <Grid>
        <Canvas Name="canvas"></Canvas>
        <Button
            Content="Button"
            Height="23"
            HorizontalAlignment="Left"
            Margin="12,12,0,0"
            Name="button1"
            VerticalAlignment="Top"
            Width="75"
            Click="button1_Click" />
    </Grid>
</UserControl>
CanvasとButtonが配置された単純なxamlである。それでは最後にC#側のコードを示す。
using System;
using System.Collections.Generic;
using System.Linq;
using System.Text;
using System.Windows;
using System.Windows.Controls;
using System.Windows.Data;
using System.Windows.Documents;
using System.Windows.Input;
using System.Windows.Media;
using System.Windows.Media.Imaging;
using System.Windows.Navigation;
using System.Windows.Shapes;

namespace PropertyBindingLesson
{
    /// <summary>
    /// MyUserControl.xaml の相互作用ロジック
    /// </summary>
    public partial class MyUserControl : UserControl
    {
        private ScaleTransform scaleTransform = new ScaleTransform(1.0d, 1.0d);

        // 依存プロパティ
        public static readonly DependencyProperty MyScaleProperty =
            DependencyProperty.Register(
                "MyScale",
                typeof(double),
                typeof(MyUserControl),
                new UIPropertyMetadata(
                    1.0d,
                    // PropertyChangedCallback
                    (d, e) =>
                    {
                        // プロパティ変更時の処理
                        // 新しい値をリソースのScaleTransformにセットする
                        (d as MyUserControl).scaleTransform.ScaleX = (double)e.NewValue;
                        (d as MyUserControl).scaleTransform.ScaleY = (double)e.NewValue;
                    })
            );

        /// <summary>
        /// 管理している全ての図形の倍率
        /// </summary>
        public double MyScale
        {
            get
            {
                return (double)GetValue(MyScaleProperty);
            }
            set
            {
                SetValue(MyScaleProperty, (double)value);
            }
        }

        /// <summary>
        /// コンストラクタ
        /// </summary>
        public MyUserControl()
        {
            InitializeComponent();
        }

        // ランダムな円を配置する
        private void button1_Click(object sender, RoutedEventArgs e)
        {
            Random rnd = new Random();

            int size = 10 + rnd.Next(100);
            Ellipse ellipse = new Ellipse(){
                Width = size,
                Height = size,
                Fill = new SolidColorBrush(
                    Color.FromArgb(
                        255,
                        (byte)rnd.Next(255),
                        (byte)rnd.Next(255),
                        (byte)rnd.Next(255)))
            };

            Canvas.SetTop( ellipse, rnd.Next((int)this.ActualHeight) );
            Canvas.SetLeft(ellipse, rnd.Next((int)this.ActualWidth) );

            ellipse.RenderTransform = scaleTransform;

            canvas.Children.Add(ellipse);
        }
    }
}
WPFの決まりごとで、バインディング対象のプロパティとするには依存プロパティとして登録する必要がある。24-56行目の記述がその部分にあたる。
注意しないといけないのは、52-53行目のsetterである。プロパティに値がセットされたタイミングでscaleTransformの値を変化させたいのだが、この箇所にその処理を書いてはいけない。どうもxamlのバインディング経由で値がセットされる場合、setterのロジックは通らないようである。そこで、値がセットされたタイミングで実行させたい処理は33行目のPropertyChangedCallback内に書くことになる。このサンプルの場合は、この箇所でscaleTransformに新しい値をセットしている。
以上が今回のサンプルのソースである。
WPFの根本思想であるデザインとロジックの分離を実現するために、多少癖のあるコーディングをしなければならないと感じる。