Android端末を傾けると、通常はそれまでに表示していた画面がそのまま横に広がった感じで表示される。
例えば、以下のようなレイアウトの画面があったとする。
/res/layout/main.xml
<?xml version="1.0" encoding="utf-8"?>
<LinearLayout xmlns:android="http://schemas.android.com/apk/res/android"
    android:orientation="vertical"
    android:layout_width="fill_parent"
    android:layout_height="fill_parent"
    >
<TextView
    android:layout_width="fill_parent"
    android:layout_height="wrap_content"
    android:text="@string/hello"
    />
	<View
	    android:layout_width="fill_parent"
	    android:layout_height="wrap_content"
	    android:layout_weight="1" />
	<LinearLayout
	    android:layout_width="fill_parent"
	    android:layout_height="48dp"
	    android:background="#99999999"
	    >
	    <Button
	    	android:id="@+id/button1"
	    	android:layout_width="wrap_content"
	    	android:layout_height="wrap_content"
	    	android:text="button1" />
	    <Button
	    	android:id="@+id/button2"
	    	android:layout_width="wrap_content"
	    	android:layout_height="wrap_content"
	    	android:text="button2" />
	    <Button
	    	android:id="@+id/button3"
	    	android:layout_width="wrap_content"
	    	android:layout_height="wrap_content"
	    	android:text="button3" />
    </LinearLayout>
</LinearLayout>
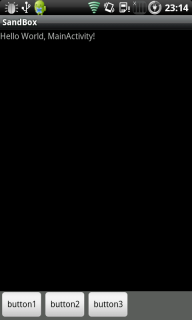
この画面の表示結果は以下のようになるが、
端末を傾けると、
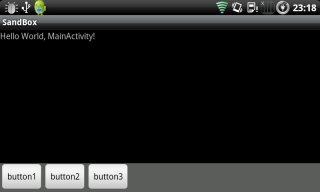
のようになる。しかし、場合によってはこのレイアウトだと見栄えが良くないと思うこともあるだろう。
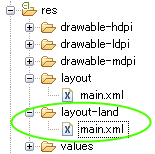
そういった時は、横向き表示用にデザインしたレイアウトを用意しておくと良い。
それをするには、resフォルダの下に「layout-land」というフォルダを新しく作り、そこに横向き用のレイアウトxmlを新しく作る。
元のレイアウト名と同じにする必要があるため、ここでは「main.xml」とした。
layout-land下のmain.xmlは以下のように書いた。
/res/layout-land/main.xml
<?xml version="1.0" encoding="utf-8"?>
<LinearLayout xmlns:android="http://schemas.android.com/apk/res/android"
    android:orientation="horizontal"
    android:layout_width="fill_parent"
    android:layout_height="fill_parent"
    >
    <TextView
    android:layout_width="wrap_content"
    android:layout_height="fill_parent"
    android:text="@string/hello"
    />
	<View
	    android:layout_width="wrap_content"
	    android:layout_height="fill_parent"
	    android:layout_weight="1" />
	<LinearLayout
		android:orientation="vertical"
	    android:layout_width="wrap_content"
	    android:layout_height="fill_parent"
	    android:background="#99999999"
	    >
	    <Button
	    	android:id="@+id/button1"
	    	android:layout_width="wrap_content"
	    	android:layout_height="wrap_content"
	    	android:text="button1" />
	    <Button
	    	android:id="@+id/button2"
	    	android:layout_width="wrap_content"
	    	android:layout_height="wrap_content"
	    	android:text="button2" />
	    <Button
	    	android:id="@+id/button3"
	    	android:layout_width="wrap_content"
	    	android:layout_height="wrap_content"
	    	android:text="button3" />
    </LinearLayout>
</LinearLayout>
この時点で実行して画面を傾けると、今度は以下のようになる。
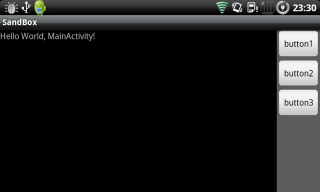
このように、端末が横になっているときは自動的にlayout-land下のレイアウトが採用されたことが分かる。
最後に、Activityのソースは以下のようになっている。
MainActivity.java
public class MainActivity extends Activity {
    /** Called when the activity is first created. */
    @Override
    public void onCreate(Bundle savedInstanceState) {
        super.onCreate(savedInstanceState);
        setContentView(R.layout.main);

        findViewById(R.id.button1).setOnClickListener(new OnClickListener() {

			@Override
			public void onClick(View v) {
				Toast.makeText(MainActivity.this, "button1", Toast.LENGTH_SHORT).show();
			}
		});

        findViewById(R.id.button2).setOnClickListener(new OnClickListener() {

			@Override
			public void onClick(View v) {
				Toast.makeText(MainActivity.this, "button2", Toast.LENGTH_SHORT).show();
			}
		});

        findViewById(R.id.button3).setOnClickListener(new OnClickListener() {

			@Override
			public void onClick(View v) {
				Toast.makeText(MainActivity.this, "button3", Toast.LENGTH_SHORT).show();
			}
		});
    }
}
javaファイルの方は、画面の向きが縦か横かにかかわらず、全く同じロジックを書いておくだけでよい。