Viewをタッチすると移動させることができるUIを考えてみる。
ツールボタン的なUIに活用できるかもしれない。
これを実現するためには、サンプルプログラムのように実装したOnTouchListenerを移動させたいViewへセットしておけばよい。
移動対象のViewはRelativeLayoutの子Viewとなっており、タッチイベントでLayoutParamsのtopMarginとleftMarginを書き換えている。
複数のViewに同じリスナを登録すれば、それぞれのViewごとに移動させることができる。
MainActivity.java
public class MainActivity extends Activity {
    /** Called when the activity is first created. */
    @Override
    public void onCreate(Bundle savedInstanceState) {
        super.onCreate(savedInstanceState);
        setContentView(R.layout.main);

        final OnTouchListener moving = new OnTouchListener() {

        	private float downX;
        	private float downY;

        	private int downLeftMargin;
        	private int downTopMargin;

        	@Override
            public boolean onTouch(View v, MotionEvent event) {

         // ViewGroup.MarginLayoutParamsでキャストすることで
                // FrameLayoutの子要素であっても同様に扱える。
                final ViewGroup.MarginLayoutParams param =
                    (ViewGroup.MarginLayoutParams)v.getLayoutParams();

                if( event.getAction() == MotionEvent.ACTION_DOWN ){

                    downX = event.getRawX();
                    downY = event.getRawY();

                    downLeftMargin = param.leftMargin;
                    downTopMargin = param.topMargin;

                    return true;
                }
                else if( event.getAction() == MotionEvent.ACTION_MOVE){

                    param.leftMargin = downLeftMargin + (int)(event.getRawX() - downX);
                    param.topMargin = downTopMargin + (int)(event.getRawY() - downY);

                    v.layout(
               param.leftMargin,
               param.topMargin,
               param.leftMargin + v.getWidth(),
               param.topMargin + v.getHeight());

                    return true;
                }

                return false;
            }
		};

        // 別々のViewに、同じリスナをセットしておく
		findViewById(R.id.myView1).setOnTouchListener(moving);
		findViewById(R.id.myView2).setOnTouchListener(moving);
    }
}
main.xml
<?xml version="1.0" encoding="utf-8"?>
<RelativeLayout xmlns:android="http://schemas.android.com/apk/res/android"
    android:orientation="vertical"
    android:layout_width="fill_parent"
    android:layout_height="fill_parent"
    >
	<LinearLayout
		android:id="@+id/myView1"
	    android:layout_width="100dp"
	    android:layout_height="200dp"
	    android:background="#ffff0000"
	    android:layout_marginLeft="0dp"
	    android:layout_marginTop="0dp"
	    android:orientation="vertical">
		<TextView
			android:layout_width="fill_parent"
			android:layout_height="wrap_content"
			android:text="toolmenu" />
		<Button
			android:layout_width="fill_parent"
			android:layout_height="wrap_content"
			android:text="Button1" />
		<Button
			android:layout_width="fill_parent"
			android:layout_height="wrap_content"
			android:text="Button2" />
		<Button
			android:layout_width="fill_parent"
			android:layout_height="wrap_content"
			android:text="Button3" />
	</LinearLayout>
	<TextView
		android:id="@+id/myView2"
	    android:layout_width="100dp"
	    android:layout_height="60dp"
	    android:background="#ff0000ff"
	    android:layout_marginLeft="50dp"
	    android:layout_marginTop="0dp"
	    android:text="MyTextView" />
</RelativeLayout>
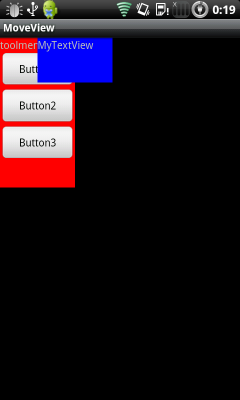
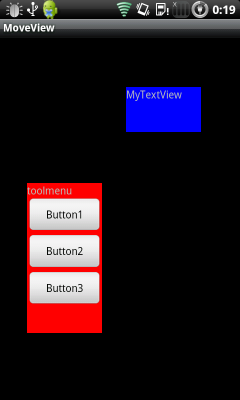
実行結果は以下のようになる。
赤いViewと青いViewをそれぞれタッチ&ムーブで移動できる。
 |
 |
このプログラムを始め作ったとき、37行目でrequestLayout()を使っていた。そうすると、Viewの一部が画面の外にはみ出すと中の要素が潰れてしまっていた。
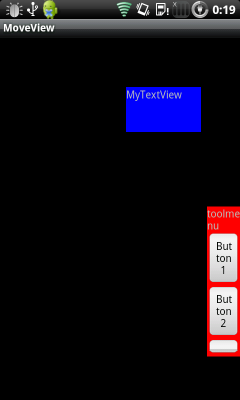
その後、layout()メソッドを使えばUI要素が潰れないことが分かったのでプログラムを修正した。
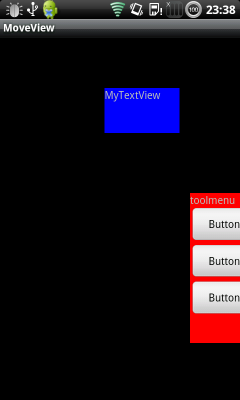
ただし実用化するならば、画面外への移動は抑制させるなりの対処が必要だろう。
Viewを移動させるやり方がわからずに困っていたので、非常に助かりました。
コメントありがとうございました。
これからも役立つ情報を提供できるようがんばっていきます。
Drag Dropのサンプル探しまくったのだけど、これをRelativeLayoutで
やるという発想が素晴らしい。実は私もMargin使って自作しようとした
矢先でこれを見つけて、助かりました。
ありがとう。
ピンバック: 【iOS】UIViewをタッチして移動させる – ザワプロ!
試しに画像(ImageView)を動かしてみようとしたところ描画されませんでした。
が、
1行目のActivity → AppCompatActivityにすると描画されました。