前回の記事でRelativeLayoutのパラメータについて調べた。
今回はいくつかその実例を示す。
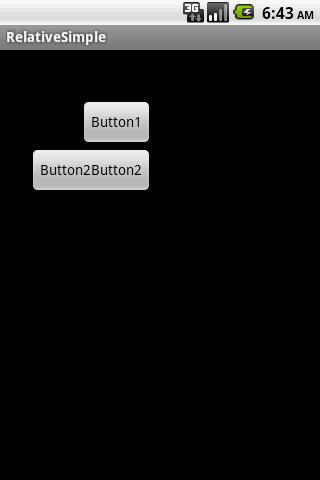
・基準となるビューの回りに配置する例
ボタン1を基準としてボタン2をその真下に配置し、右位置をそろえる。
Button2でlayout_belowとlayout_alignRightを指定している。
<RelativeLayout xmlns:android="http://schemas.android.com/apk/res/android"
    android:orientation="vertical"
    android:layout_width="fill_parent"
    android:layout_height="fill_parent"
    >
<Button
    android:layout_width="wrap_content"
    android:layout_height="wrap_content"
    android:layout_marginTop="50dp"
    android:layout_marginLeft="80dp"
    android:text="Button1"
    android:id="@+id/button1"
    />
<Button
    android:layout_width="wrap_content"
    android:layout_height="wrap_content"
    android:layout_below="@id/button1"
   android:layout_alignRight="@id/button1"
   android:text="Button2Button2"
/>
</RelativeLayout>
実行結果
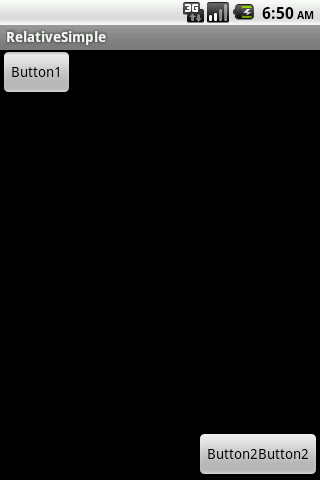
・親を基準として相対する位置に配置する例
Button1はlayout_alignParentLeftを有効にして親Viewを基準に左にあわせるように配置、
Button2はlayout_alignParentBottomとlayout_alignParentRightを有効にして右下にあわせるように配置してみた。
<RelativeLayout xmlns:android="http://schemas.android.com/apk/res/android"
    android:orientation="vertical"
    android:layout_width="fill_parent"
    android:layout_height="fill_parent"
    >
<Button
    android:layout_width="wrap_content"
    android:layout_height="wrap_content"
    android:layout_alignParentLeft="true"
    android:text="Button1"
    android:id="@+id/button1"
    />
<Button
    android:layout_width="wrap_content"
    android:layout_height="wrap_content"
   android:layout_alignParentBottom="true"
   android:layout_alignParentRight="true"
   android:text="Button2Button2"
/>
</RelativeLayout>
実行結果