Androidを学び始めた頃は一つのActivityに対しては一つのレイアウトxmlしか割り当てられないものと思っていた。
だが、LayoutInflaterを使えば動的にレイアウトxmlからViewを生成できることが分かった。
LayoutInflaterはActivityのgetLayoutInflater()メソッドで取得できる。
以下にInflaterのサンプルを示す。
このサンプルは、2つのボタンを押すことでLinearLayout内のView要素を書き換えている例である。
public class MainActivity extends Activity {
    /** Called when the activity is first created. */
    @Override
    public void onCreate(Bundle savedInstanceState) {
       super.onCreate(savedInstanceState);
       setContentView(R.layout.main);

       final LinearLayout layout = (LinearLayout)findViewById(R.id.linearLayout1);

       findViewById(R.id.button1).setOnClickListener(new OnClickListener() {

           @Override
           public void onClick(View v) {

               layout.removeAllViews();
               getLayoutInflater().inflate(R.layout.layout1, layout);
           }
       });

       findViewById(R.id.button2).setOnClickListener(new OnClickListener() {

           @Override
           public void onClick(View v) {

               layout.removeAllViews();
               getLayoutInflater().inflate(R.layout.layout2, layout);
           }
       });
    }
}
main.xmlは次のようにした。
<?xml version="1.0" encoding="utf-8"?>
<LinearLayout xmlns:android="http://schemas.android.com/apk/res/android"
    android:orientation="vertical"
    android:layout_width="fill_parent"
    android:layout_height="fill_parent"
    >
<TextView
    android:layout_width="fill_parent"
    android:layout_height="wrap_content"
    android:text="@string/hello"
    />
<LinearLayout
    android:layout_height="wrap_content"
    android:id="@+id/linearLayout1"
    android:layout_width="fill_parent"
    android:layout_weight="1">
</LinearLayout>
<Button android:text="Button"
    android:id="@+id/button1"
    android:layout_width="wrap_content"
    android:layout_height="wrap_content">
</Button>
<Button android:text="Button"
    android:id="@+id/button2"
    android:layout_width="wrap_content"
    android:layout_height="wrap_content">
</Button>
</LinearLayout>
また、res/layoutフォルダ以下に次の2つのレイアウトxmlを用意しておく。
layout1.xml
<?xml version="1.0" encoding="utf-8"?>
<LinearLayout
 xmlns:android="http://schemas.android.com/apk/res/android"
 android:layout_width="fill_parent"
 android:layout_height="fill_parent">
    <TextView
        android:text="This is layout1"
        android:id="@+id/textView1"
        android:layout_width="wrap_content"
        android:layout_height="wrap_content" />
</LinearLayout>
layout2.xml
<?xml version="1.0" encoding="utf-8"?>
<LinearLayout
 xmlns:android="http://schemas.android.com/apk/res/android"
 android:layout_width="fill_parent"
 android:layout_height="fill_parent" android:orientation="vertical">
    <TextView
        android:text="This is layout2"
        android:id="@+id/textView1"
        android:layout_width="wrap_content"
        android:layout_height="wrap_content" />
    <Button
        android:text="Button"
        android:id="@+id/button1"
        android:layout_width="wrap_content"
        android:layout_height="wrap_content" />
</LinearLayout>
ボタンを押すと、用意したレイアウトに切り替わる。
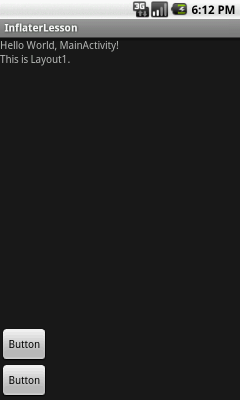
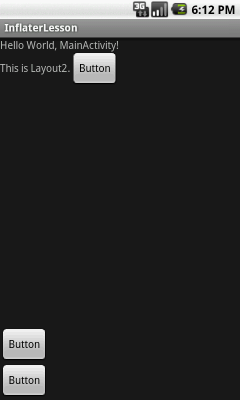
このように、まるでHTMLをDOMで操作するような感覚で柔軟にGUIを変更することができる。